(sorry but could not for the life of me get the pic to rotate)
The wicker use to be white but now a lot of that white was worn away. When I turned it around I saw a sticker at the bottom. Looking closer it was a Pier One price tag..I could not make out how much it was originally but there was no mistake it was Pier One. I am very aware of Pier One, their furniture and everything they sell. In fact I bought a coffee table from them a long time ago and many many kitchen ware items. So I knew this originally was a pricey item.
Guess what the thrift store price was... $24.99!
You should have seen Bestie's face as I was lugging that thing under my arm on the way to the register. As you can see from above the first thing I did was mask it off so my crazy spray painting didn't get all over the mirror. In the end I did get a little spray on it but nail polish remover took care of it in seconds. I decided that I was going to try out this VERY cheep spray paint we have at work. (remember I wear an orange apron) I always thought this spray paint, because it was so cheep, wasn't that good. NOOOOO it worked perfect and turned out great.
So for .97 cents.. go for it!
 Once it was all painted and let dry 24 hours this mirror had nothing on the back in which to hang it with. I knew I wanted to hang it over my bed so I had to find a way to allow me to do that. I decided to glue a 3 x 2 piece of board on the back. The very best thing to use is GORILLA GLUE! There are quite a few different types of Gorilla Glue so get the one that best suites your project, but no matter which one you use it will never come apart.
  Made sure it was straight and level. See the bubble floating right in the middle.
I put a good amount of glue on the board and placed a large heavy brick on the top and let it set over night.
The last thing I needed to do was add the picture hanging clips to the board. I found the perfect ones. They are large to handle heavy items and very easy to use. Just place and hammer in the nails that are attached to each end. In my case I had to tap not hammer.. I didn't want to break the mirror on the other side. I attached two of them, one on each side of the board.
So ready for the finished project???
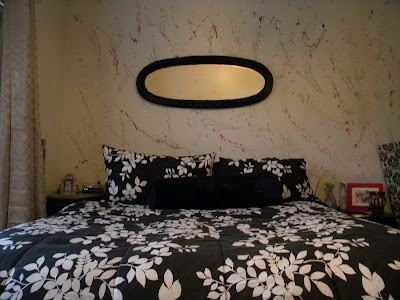
I am in love with my new mirror. It turned out soooo great and it took no time at all. The price for everything was:
Mirror = $24.99
2 spray cans @ .97 ea.. = $1.94
Picture Hangers = $2.97
Had the glue and the board
Total $ 29.90
My beautiful mirror all done for under $30.00.. BAMMMMM!
Here it is on my wall over my bed. What do you think?
Big Mamma Luvs Ya

XOXO


No comments:
Post a Comment